Tampilkan postingan dengan label Networks. Tampilkan semua postingan

Rabu, 16 Mei 2012

How to Load balancing Mikrotik - NTH mode

Introduction

This example is improved (different) version of round-robin load balancing example. It adds persistent user sessions, i.e. a particular user would use the same source IP address for all outgoing connections. Consider the following network layout:
LoadBalancing.jpg

Quick Start for Impatient

Configuration export from the gateway router:
/ ip address
add address=192.168.0.1/24 network=192.168.0.0 broadcast=192.168.0.255 interface=Local 
add address=10.111.0.2/24 network=10.111.0.0 broadcast=10.111.0.255 interface=wlan2
add address=10.112.0.2/24 network=10.112.0.0 broadcast=10.112.0.255 interface=wlan1

/ ip firewall mangle
add chain=prerouting src-address-list=odd in-interface=Local action=mark-connection \
  new-connection-mark=odd passthrough=yes 
add chain=prerouting src-address-list=odd in-interface=Local action=mark-routing \
  new-routing-mark=odd passthrough=no
add chain=prerouting src-address-list=even in-interface=Local action=mark-connection \
  new-connection-mark=even passthrough=yes 
add chain=prerouting src-address-list=even in-interface=Local action=mark-routing \
  new-routing-mark=even passthrough=no
add chain=prerouting in-interface=Local connection-state=new nth=2,1 \ 
    action=mark-connection new-connection-mark=odd passthrough=yes
add chain=prerouting in-interface=Local action=add-src-to-address-list \
  address-list=odd address-list-timeout=1d connection-mark=odd passthrough=yes 
add chain=prerouting in-interface=Local connection-mark=odd action=mark-routing \ 
    new-routing-mark=odd passthrough=no
add chain=prerouting in-interface=Local connection-state=new nth=2,2 \ 
    action=mark-connection new-connection-mark=even passthrough=yes
add chain=prerouting in-interface=Local action=add-src-to-address-list \
  address-list=even address-list-timeout=1d connection-mark=even passthrough=yes 
add chain=prerouting in-interface=Local connection-mark=even action=mark-routing \ 
    new-routing-mark=even passthrough=no

/ ip firewall nat 
add chain=srcnat out-interface=wlan1 action=masquerade
add chain=srcnat out-interface=wlan2 action=masquerade

/ ip route 
add dst-address=0.0.0.0/0 gateway=10.111.0.1 scope=255 target-scope=10 routing-mark=odd
add dst-address=0.0.0.0/0 gateway=10.112.0.1 scope=255 target-scope=10 routing-mark=even 
add dst-address=0.0.0.0/0 gateway=10.112.0.1 scope=255 target-scope=10 

Explanation

First we give a code snippet and then explain what it actually does.

IP Addresses

/ ip address 
add address=192.168.0.1/24 network=192.168.0.0 broadcast=192.168.0.255 interface=Local
add address=10.111.0.2/24 network=10.111.0.0 broadcast=10.111.0.255 interface=wlan2 
add address=10.112.0.2/24 network=10.112.0.0 broadcast=10.112.0.255 interface=wlan1 
The router has two upstream (WAN) interfaces with the addresses of 10.111.0.2/24 and 10.112.0.2/24. The LAN interface has the name "Local" and IP address of 192.168.0.1/24.

Mangle

/ ip firewall mangle 
add chain=prerouting src-address-list=odd in-interface=Local action=mark-connection \
  new-connection-mark=odd passthrough=yes 
add chain=prerouting src-address-list=odd in-interface=Local action=mark-routing \
  new-routing-mark=odd 
 
All traffic from customers having their IP address previously placed in the address list "odd" is instantly marked with connection and routing marks "odd". Afterwards the traffic is excluded from processing against successive mangle rules in prerouting chain.

/ ip firewall mangle 
add chain=prerouting src-address-list=even in-interface=Local action=mark-connection \
  new-connection-mark=even passthrough=yes 
add chain=prerouting src-address-list=even in-interface=Local action=mark-routing \
  new-routing-mark=even 
 
Same stuff as above, only for customers having their IP address previously placed in the address list "even".

/ ip firewall mangle 
add chain=prerouting in-interface=Local connection-state=new nth=2,1 \ 
    action=mark-connection new-connection-mark=odd passthrough=yes
add chain=prerouting in-interface=Local action=add-src-to-address-list \
  address-list=odd address-list-timeout=1d connection-mark=odd passthrough=yes 
add chain=prerouting in-interface=Local connection-mark=odd action=mark-routing \ 
    new-routing-mark=odd passthrough=no
 
First we take every second packet that establishes new session (note connection-state=new), and mark it with connection mark "odd". Consequently all successive packets belonging to the same session will carry the connection mark "odd". Note that we are passing these packets to the second and third rules (passthrough=yes). Second rule adds IP address of the client to the address list to enable all successive sessions to go through the same gateway. Third rule places the routing mark "odd" on all packets that belong to the "odd" connection and stops processing all other mangle rules for these packets in prerouting chain.

/ ip firewall mangle 
add chain=prerouting in-interface=Local connection-state=new nth=2,2 \ 
    action=mark-connection new-connection-mark=even passthrough=yes
add chain=prerouting in-interface=Local action=add-src-to-address-list \
  address-list=even address-list-timeout=1d connection-mark=even passthrough=yes 
add chain=prerouting in-interface=Local connection-mark=even action=mark-routing \ 
    new-routing-mark=even passthrough=no
 
These rules do the same for the remaining half of the traffic as the first three rules for the first half of the traffic.
The code above effectively means that each new connection initiated through the router from the local network will be marked as either "odd" or "even" with both routing and connection marks.
The above works fine. There are however some situations where you might find that the same IP address is listed under both the ODD and EVEN scr-address-lists. This behavior causes issues with apps that require persistent connections. A simple remedy for this situation is to add the following statement to your mangle rules:

add chain=prerouting in-interface=Local connection-state=new nth=2,2 \ 
    src-address-list=!odd action=mark-connection new-connection-mark=even \
    passthrough=yes
This will ensure that the new connection will not already be part of the ODD src-address-list. You will have to do the same for the ODD mangle rule thus excluding IP's already part of the EVEN scr-address-list.

NAT

/ ip firewall nat 
add chain=srcnat out-interface=wlan1 action=masquerade
add chain=srcnat out-interface=wlan2 action=masquerade

Fix the source address according to the outgoing interface.

Routing

/ ip route 
add dst-address=0.0.0.0/0 gateway=10.111.0.1 scope=255 target-scope=10 routing-mark=odd 
add dst-address=0.0.0.0/0 gateway=10.112.0.1 scope=255 target-scope=10 routing-mark=even
For all traffic marked "odd" (consequently having 10.111.0.2 translated source address) we use 10.111.0.1

gateway. In the same manner all traffic marked "even" is routed through the 10.112.0.1 gateway.

/ ip route
add dst-address=0.0.0.0/0 gateway=10.112.0.1 scope=255 target-scope=10
 
Finally, we have one additional entry specifying that traffic from the router itself (the traffic without any routing marks) should go to 10.112.0.1 gateway.

 note:
http://wiki.mikrotik.com/wiki/NTH_load_balancing_with_masquerade
Kamis, 05 April 2012

external proxy + mikrotik


For external Proxy setting .. ( external proxy and mikrotik )
Study Kasus, Mohon diperhatikan :
  1. Semua aktifitas user port 80, 81, 8080 dan 3128 di belokkan ke proxy, jika proxy belum mengcache maka si proxy akan mengambil dari Modem(internet), menyimpan di cache sekaligus menjawab request dari user.
  2. Aktivitas user selain port 80, 81, 8080 dan 3128 akan melewati jalur menuju arah modem [download dari FTP ata dari P2P => jika akses P2P tidak di blok]

Dari 2 study kasus di atas muncullah pemikiran, bahwa :
  1. Semua akses ke arah Modem harus di limit agar ada BW dapat tersisa yg bisa di gunakan untuk GAME online mengingat port game tidak di belokkan ke proxy squid.
  2. Sedangkan akses antara Proxy Squid dan User di LOSS agar terjadi HIT atau transfer packet yg udah ada di cache proxy dapat di nikmati LOSS oleh user.
Dari alur pemikiran itu sang ubur cumi menggasilkan beberapa baris untuk mendapatkan proxy hit dari external proxy. Dan membatasi akses user kemodem yang berarti juga memberikan akses yang lebih leluasa untuk game yang nota bene tidak di lewatkan melalui proxy.

Script ubur cumi seperti di bawah ini

PROXY HIT LOSS
/ip firewall mangle

add action=mark-connection chain=forward comment=Proxy_HIT \
disabled=no in-interface=Proxy new-connection-mark=Hit\
out-interface=Lokal passthrough=yes protocol=tcp

add action=mark-packet chain=forward comment="" connection-mark=Hit\
disabled=no in-interface=Proxy new-packet-mark=Proxy Hit\
out-interface=Lokal passthrough=no protocol=tcp

/queue tree

add burst-limit=0 burst-threshold=0 burst-time=0s disabled=no\
limit-at=0 max-limit=0 name=.:Proxy Hit:. packet-mark=Hit\
parent=global-out priority=1 queue=default
Nah itu dia proxy hit untuk meloloskan paket agar tidak terlimit oleh mikrotik, namun si ubur masih belum puas dengan hal tersebut dan muncullah pikiran lainnyah bahwa koneksi ke modem dari user atau dari user ke modem harus juga di batasi.

Dan muncullah script di bawah ini

2. Limit Aktifitas modem - user
/ip firewall mangle

add action=mark-connection chain=forward \
comment=DownloadfromLan connection-bytes=256000-4294967295\
disabled=no in-interface=Modem new-connection-mark=DownLan\
out-interface=Lokal passthrough=yes protocol=tcp

add action=mark-packet chain=forward comment="" \
connection-mark=Down Lan disabled=no \
in-interface=Modem new-packet-mark=DownloadLan\
out-interface=Lokal passthrough=no protocol=tcp

/que ty

add kind=pcq name=Download pcq-classifier=dst-address \
pcq-limit=50 pcq-rate=128000 pcq-total-limit=2000

/que tr
add burst-limit=0 burst-threshold=0 burst-time=0s \
disabled=no limit-at=0 max-limit=256000 name=LimitDownloadformLan\
packet-mark=DownloadLan parent=global-out priority=8 queue=Download
Pendapat ubur cumi tidak hanya sampai disitu masih adalagi yang lain. Apa itu ?
Yakni Aktifitas modem ke proxy harus dibatasi. Lalu muncullah script yang dibuat uburcumi
/ip firewall mangle

add action=mark-connection chain=forward comment=DownloadfromProxy\
connection-bytes=256000-4294967295 disabled=no in-interface=Modem \
new-connection-mark=Down Proxy out-interface=Proxy\
passthrough=yes protocol=tcp

add action=mark-packet chain=forward comment=""\
connection-mark=Down Proxy\ disabled=no in-interface=Modem \
new-packet-mark=DownloadProxy out-interface=Proxy \
passthrough=no protocol=tcp

/que ty
add kind=pcq name=Download pcq-classifier=dst-address pcq-limit=50\
pcq-rate=128000 pcq-total-limit=2000

/que tr
add burst-limit=0 burst-threshold=0 burst-time=0s disabled=no limit-at=0 \
max-limit=256000 name=Limit DownloadfromProxy\
packet-mark=DownloadProxy parent=global-out priority=8 queue=Download
Apakah ubur cumi berhenti sampai disitu ?. Ternyata tidak. Ubur cumi malah menambahi sedikit lagi scriptnya sebelum di ulas oleh userlain di forummikrotik.com

ini dia kata uburcumi

kalo gw di RB750G buat hotspot mark HIT make DSCP sama content kurang maknyus ya. tapi pas make layer 7 lumayan tanya kenapa?
http/(0\.9|1\.0|1\.1)[\x09-\x0d ][1-5][0-9][0-9][\x09-\x0d -~]*(x-cache: hit)
mungkin ada yg mau coba2 mark hit make Layer 7?
thank UBUR

Jumat, 04 Februari 2011

Setting modem telkomflash Ubuntu 10.10

 Modem telkomsel flash seri E1775 / E1552 / E620

1. download : ( di http://packages.ubuntu.com/lucid/i386/usb-modeswitch/download )
ex:
~#wget http://debian.nctu.edu.tw/ubuntu//pool/universe/u/usb-modeswitch/usb-modeswitch_1.1.0-2_i386.deb

data modeswitch : (http://packages.ubuntu.com/lucid/all/usb-modeswitch-data/download )
ex:
~#wget http://www.club.cc.cmu.edu/pub/ubuntu//pool/universe/u/usb-modeswitch-data/usb-modeswitch-data_20100127-1_all.deb


2. Install :

# dpkg -i usb-modeswitch_1.1.0-2_i386.deb
# dpkg -i usb-modeswitch-data_20100127-1_all.deb

3. Masukkan Modem Huawei.

4. masuk ke : System --> Preference --> Network Connections --> Mobil Broadband --> Add --> pastikan modem huaweinya sidah terditeksi --> Forward --> Country (indonesia) -->> Profider Telkomsel --> Select Plan (pilih my plan not listen) --> isi APN dengan "internet" (tanpa kutip") --> Apply

5. Klik Connect automatically
Number = *99#
username = (kosong)
password = (kosong)
APN = internet
Available to all user = cecklist

APPLY

6. Oke happy enjoy ..

7. untuk matikan & hidupkan koneksi nya : klik kanan tanda wireless/connection network diatas lalu ada pilihan " enable mobile broadband " (v) jika aktif & hilangkan (v) jika off

yudhax

Senin, 01 November 2010

Setting SAMBA SERVER on Opensolaris/SUN machine

How to Configure Samba From the Command Line

1. Open a Terminal and assume the root role.
2. Copy the example file to the smb.conf file and open it with an editor.

# cd /etc/sfw # cp smb.conf-example smb.conf # vi smb.conf 

3. To make the setting active, remove any settings that begin with ";", as these are disabled. The template includes full comments for each setting.
4. Modify are the following settings:

  • [global]
    • workgroup = Change to your WORKGROUP.
  • [homes]
    • path = Add your path to your home directories ( /export/home/%u ).
    • browsable = Change to yes to allow the home share to be seen by the browser service.

5. Use the smbpasswd command to add your username.

# smbpasswd -a  New SMB password: Re-Type New SMB Password: Added user  

You are ready to start Samba.

How To Start Samba

1. Enable the samba and wins services.

# svcadm enable samba # svcadm enable wins 

2. Check that the daemons are online:
For example:

# svcs -a| grep wins online         16:06:20 svc:/network/wins:default # svcs -a | grep samba online         16:06:20 svc:/network/samba:default 

You should now be able to access your home directory and your printers from your Windows client.

If you've set browsable = yes in your smb.conf file, you should see the shares in Network Neighborhood.

Alternatively, you could map your home directory to always mount at login.


note: wiki SUN

yudhax


Selasa, 09 Maret 2010

D-Link More Better with Load balancing

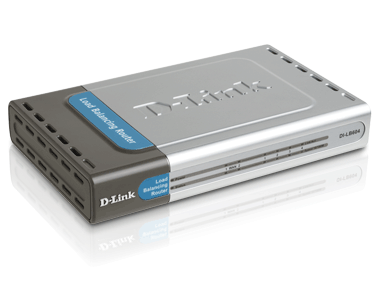
SERI : DI-LB604 4-Port Load Balancing Router (standar)
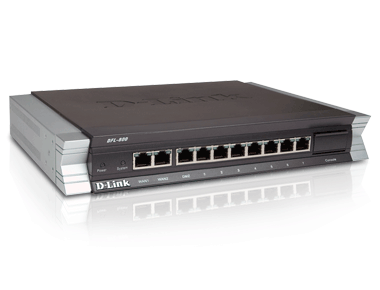
SERI: DFL-800 NetDefend Network Security UTM Firewall, 2 WAN, 1 DMZ, 7 LAN, 90-Day IPS/AV/WCF Subscription (more better)
-0------------0----------------0--------------0-------------

Description

The DI-LB604 Load Balancing Router features dual WAN ports, four LAN ports and firewall protection providing consistent network uptime and reliable Ethernet connection.

--

Description
DFL-800
This easy-to-deploy Desktop VPN Firewall solution is designed for small-to-medium sized businesses and is readily integrated into established networks.

Saat menggunakannya lebih nyaman untuk koneksi dibawah 50user.

mungkin untuk Perkantoran dengan load tinggi dan warnet dengan jumlah koneksi speedy 2bh. dapat direkomendasikan menggunakan alat ini.


Thanks

Yudhax

Senin, 05 Oktober 2009

Mikrotik Load Balancing

Mikrotik Load Balancing

Setting Mikrotik ini Terinspirasi dari blog mas Dwi Nanto dan MikroTik Wiki, dan telah disesuaikan dgn Kondisi..

modem 1
10.10.1.1
|
|
10.10.1.2 ——– MIkrotik Load Balancing — 192.168.0.1 — hub — Client
10.10.2.2
|
|
modem 2
10.10.2.1


Pc-Router Speknya
– Dual P-III - 800Mhz
– Memory 64Mb
– IDE Flash Disk 1 Gb


Konfigurasinya

1. Interface Konfigurasi

/ interface ethernet
set Modem1 name=”Modem1" mtu=1500 \
mac-address=00:10:4B:0D:95:02 arp=enabled \
disable-running-check=yes auto-negotiation=yes \
full-duplex=yes cable-settings=default \
speed=100Mbps comment=”" disabled=no

set Lan name=”Lan” mtu=1500 \
mac-address=00:0D:88:B2:7D:50 arp=enabled \
disable-running-check=yes auto-negotiation=yes \
full-duplex=yes cable-settings=default \
speed=100Mbps comment=”" disabled=no

set Modem2 name=”Modem2? mtu=1500 \
mac-address=00:13:46:2C:DE:13 arp=enabled \
disable-running-check=yes auto-negotiation=yes \
full-duplex=yes cable-settings=default \
speed=100Mbps comment=”" disabled=no


2. Ip Address Konfigurasi

/ ip address
add address=192.168.0.1/24 network=192.168.0.0 \
broadcast=192.168.0.255 \
interface=Lan comment=”" disabled=no

add address=10.10.1.2/24 network=10.10.1.0 \
broadcast=10.10.1.255 \
interface=Modem1 comment=”" disabled=no

add address=10.10.2.2/24 network=10.10.2.0 \
broadcast=10.10.2.255 \
interface=Modem2 comment=”" disabled=no


3. Routing IP

/ ip route
add dst-address=0.0.0.0/0 gateway=10.10.2.1 scope=255 \
target-scope=10 routing-mark=odd \
comment=”" disabled=no

add dst-address=0.0.0.0/0 gateway=10.10.1.1 scope=255 \
target-scope=10 routing-mark=even \
comment=”" disabled=no

add dst-address=0.0.0.0/0 gateway=10.10.1.1 scope=255 \
target-scope=10 comment=”" disabled=no


4. Mangle Marking Paket

/ ip firewall mangle
add chain=prerouting in-interface=Lan \
connection-state=new nth=1,1,0 \
action=mark-connection new-connection-mark=odd \
passthrough=yes comment=”Load Balancing” disabled=no

add chain=prerouting in-interface=Lan \
connection-mark=odd action=mark-routing \
new-routing-mark=odd passthrough=no \
comment=”" disabled=no

add chain=prerouting in-interface=Lan \
connection-state=new nth=1,1,1 \
action=mark-connection new-connection-mark=even \
passthrough=yes comment=”" disabled=no

add chain=prerouting in-interface=Lan \
connection-mark=even action=mark-routing \
new-routing-mark=even passthrough=no \
comment=”" disabled=no

add chain=postrouting out-interface=Lan \
dst-address=192.168.0.2 action=mark-packet \
new-packet-mark=operator-down passthrough=no


5. Buat rule nat-masquerade untuk network 192.168.0.0/24 [IP - Firewall - Nat]

/ ip firewall nat
add chain=srcnat src-address=192.168.0.0/24 \
action=masquerade

add chain=srcnat connection-mark=odd action=src-nat \
to-addresses=10.10.2.2 to-ports=0-65535

add chain=srcnat connection-mark=even action=src-nat \
to-addresses=10.10.1.2 to-ports=0-65535


6. Setting DNS
/ ip dns set
primary-dns=202.134.1.10 secondary-dns=202.134.0.155 \
allow-remote-requests=yes cache-size=4096KiB \
cache-max-ttl=1w cache-used=90KiB

Label: Mikrotik

Minggu, 15 Februari 2009

basic Denial Of Service (DoS) Attacks

A denial of service (DoS) attack is an attack that clogs up so much memory on the target system that it can not serve it's users, or it causes the target system to crash, reboot, or otherwise deny services to legitimate users.There are several different kinds of dos attacks as discussed below:-

1) Ping Of Death :-
The ping of death attack sends oversized ICMP datagrams (encapsulated in IP packets) to the victim.The Ping command makes use of the ICMP echo request and echo reply messages and it's commonly used to determine whether the remote host is alive. In a ping of death attack, however, ping causes the remote system to hang, reboot or crash. To do so the attacker uses, the ping command in conjuction with -l argument (used to specify the size of the packet sent) to ping the target system that exceeds the maximum bytes allowed by TCP/IP (65,536).
example:- c:/>ping -l 65540 hostname
Fortunately, nearly all operating systems these days are not vulnerable to the ping of death attack.

2) Teardrop Attack :- Whenever data is sent over the internet, it is broken into fragments at the source system and reassembled at the destination system. For example you need to send 3,000 bytes of data from one system to another. Rather than sending the entire chunk in asingle packet, the data is broken down into smaller packets as given below:
* packet 1 will carry bytes 1-1000.
* packet 2 will carry bytes 1001-2000.
* packet 3 will carry bytes 2001-3000.
In teardrop attack, however, the data packets sent to the target computer contais bytes that overlaps with each other.
(bytes 1-1500) (bytes 1001-2000) (bytes 1500-2500)
When the target system receives such a series of packets, it can not reassemble the data and therefore will crash, hang, or reboot.
Old Linux systems, Windows NT/95 are vulnerable.

3) SYN - Flood Attack :- In SYN flooding attack, several SYN packets are sent to the target host, all with an invalid source IP address. When the target system receives these SYN packets, it tries to respond to each one with a SYN/ACK packet but as all the source IP addresses are invalid the target system goes into wait state for ACK message to receive from source. Eventually, due to large number of connection requests, the target systems' memory is consumed. In order to actually affect the target system, a large number of SYN packets with invalid IP addresses must be sent.

4) Land Attack :-
A land attack is similar to SYN attack, the only difference being that instead of including an invalid IP address, the SYN packet include the IP address of the target sysetm itself. As a result an infinite loop is created within the target system, which ultimately hangs and crashes.Windows NT before Service Pack 4 are vulnerable to this attack.

5) Smurf Attack :- There are 3 players in the smurf attack–the attacker,the intermediary (which can also be a victim) and the victim. In most scenarios the attacker spoofs the IP source address as the IP of the intended victim to the intermediary network broadcast address. Every host on the intermediary network replies, flooding the victim and the intermediary network with network traffic.

Result:- Performance may be degraded such that the victim, the victim and intermediary networks become congested and unusable, i.e. clogging the network and preventing legitimate users from obtaining network services.

6) UDP - Flood Attack :- Two UDP services: echo (which echos back any character received) and chargen (which generates character) were used in the past for network testing and are enabled by default on most systems. These services can be used to launch a DOS by connecting the chargen to echo ports on the same or another machine and generating large amounts of network traffic.

Thanks kev

Basic Technic Input Validation Attacks (hacking)

Input Validation Attacks are where an attacker intentionally sends unusual input in the hopes of confusing the application.
The most common input validation attacks are as follows-

1) Buffer Overflow :- Buffer overflow attacks are enabled due to sloppy programming or mismanagement of memory by the application developers. Buffer overflow may be classified into stack overflows, format string overflows, heap overflows and integer overflows. It may possible that an overflow may exist in language’s (php, java, etc.) built-in functions.
To execute a buffer overflow attack, you merely dump as much data as possible into an input field. The attack is said to be successful when it returns an application error. Perl is well suited for conducting this type of attack.
Here’s the buffer test, calling on Perl from the command line:
$ echo –e “GET /login.php?user=\
> `perl –e ‘print “a” x 500’`\nHTTP/1.0\n\n” | \
nc –vv website 80
This sends a string of 500 “a” characters for the user value to the login.php file.
Buffer overflow can be tested by sending repeated requests to the application and recording the server's response.

2) Canonicalization :- These attacks target pages that use template files or otherwise reference alternate files on the web server. The basic form of this attack is to move outside of the web document root in order to access system files, i.e., “../../../../../../../../../boot.ini”. This type of functionality is evident from the URL and is not limited to any one programming language or web server. If the application does not limit the types of files that it is supposed to view, then files outside of the web document root are targeted, something like following-
/menu.asp?dimlDisplayer=menu.asp
/webacc?User.asp=login.htt
/SWEditServlet?station_path=Z&publication_id=2043&template=login.tem
/Getfile.asp?/scripts/Client/login.js
/includes/printable.asp?Link=customers/overview.htm

3) Cross-site Scripting (XSS) :- Cross-site scripting attacks place malicious code, usually JavaScript, in locations where other users see it. Target fields in forms can be addresses, bulletin board comments, etc.
We have found that error pages are often subject to XSS attacks. For example, the URL for a normal application error looks like this:
http://website/inc/errors.asp?Error=Invalid%20password
This displays a custom access denied page that says, “Invalid password”. Seeing a string
on the URL reflected in the page contents is a great indicator of an XSS vulnerability. The attack would be created as:
http://website/inc/errors.asp?Error=That is, place the script tags on the URL.

4) SQL Injection :- This kind of attack occurs when an attacker uses specially crafted SQL queries as an input, which can open up a database. Online forms such as login prompts, search enquiries, guest books, feedback forms, etc. are specially targeted.
The easiest test for the presence of a SQL injection attack is to append “or+1=1” to the URL and inspect the data returned by the server.
example:- http://www.domain.com/index.asp?querystring=sports' or 1=1--

Basic BlueTooth Hacking

Discovering Bluetooth Devices :- 

Before any two bluetooth enabled devices can start communicating with one another, they must carry out a procedure known as discovery. It can be carried out by scanning for other active devices within the range.

Recommended Tools

BlueScanner It will try to extract as much information as possible for each newly discovered device Download
BlueSniff It is a GUI-based utility for finding discoverable and hidden Bluetooth-enabled devices Download
BTBrowser It is a J2ME application that can browse and explore the technical specification of surrounding Bluetooth enabled devices. It works on phones that supports JSR-82 - the Java Bluetooth specification Download
BTCrawler It is a scanner for Windows Mobile based devices. It also implements the BlueJacking and BlueSnarfing attacks -----

Hacking Bluetooth Devices :-
There are a variety of different types of bluetooth related threats and attacks that can be executed against unsuspecting mobile phone users. Following are some of the most common types of threats :-

1) BluePrinting Attack :- Information gathering is the first step in the quest to break into target system. Even BlueTooth devices can be fingerprinted or probed for information gathering using the technique known as BluePrinting. Using this one can determine manufacturer, model, version, etc. for target bluetooth enabled device.
Recommended Tools
BluePrint As the name suggests Download
BTScanner It is an information gathering tool that allows attacker to query devices without the need to carry out pairing Download

2) BlueJack Attack :-
Bluejacking is the process of sending an anonymous message from a bluetooth enabled phone to another, within a particular range without knowing the exact source of the recieved message to the recepient.
Recommended Tools
FreeJack Bluejacking tool written in JAVA -----
CIHWB Can I Hack With Bluetooth (CIHWB) is a Bluetooth security auditing framework for Windows Mobile 2005. Supports BlueSnarf, BlueJack, and some DoS attacks. Should work on any PocketPC with the Microsoft Bluetooth stack Download

3) BlueSnarf Attack :- Bluesnarfing is the process of connecting vulnerable mobile phones through bluetooth, without knowing the victim. It involves OBEX protocol by which an attacker can forcibly push/pull sensitive data in/out of the victim's mobile phone, hence also known as OBEX pull attack.
This attack requires J2ME enabled mobile phones as the attacker tool. With J2ME enabled phone, just by using bluesnarfing tools like Blooover, Redsnarf, Bluesnarf, etc. an attacker can break into target mobile phone for stealing sensitive data such as address book, photos, mp3, videos, SMS, ......!
Recommended Tools
Blooover It is a J2ME-based auditing tool. It is intended to serve as an auditing tool to check whether a mobile phone is vulnerable. It can also be used to carry out BlueBug attack Download
RedSnarf One of the best bluesnarfing tool .
BlueSnarfer It downloads the phone-book of any mobile device vulnerable to Bluesnarfing Download


thanks kev

Wireless Hacking

Wireless networks broadcast their packets using radio frequency or optical wavelengths. A modern laptop computer can listen in. Worse, an attacker can manufacture new packets on the fly and persuade wireless stations to accept his packets as legitimate.
The step by step procerdure in wireless hacking can be explained with help of different topics as follows:-

1) Stations and Access Points :- A wireless network interface card (adapter) is a device, called a station, providing the network physical layer over a radio link to another station.
An access point (AP) is a station that provides frame distribution service to stations associated with it. 
The AP itself is typically connected by wire to a LAN. Each AP has a 0 to 32 byte long Service Set Identifier (SSID) that is also commonly called a network name. The SSID is used to segment the airwaves for usage.

2) Channels :- The stations communicate with each other using radio frequencies between 2.4 GHz and 2.5 GHz. Neighboring channels are only 5 MHz apart. Two wireless networks using neighboring channels may interfere with each other.

3) Wired Equivalent Privacy (WEP) :- It is a shared-secret key encryption system used to encrypt packets transmitted between a station and an AP. The WEP algorithm is intended to protect wireless communication from eavesdropping. A secondary function of WEP is to prevent unauthorized access to a wireless network. WEP encrypts the payload of data packets. Management and control frames are always transmitted in the clear. WEP uses the RC4 encryption algorithm.

4) Wireless Network Sniffing :- Sniffing is eavesdropping on the network. A (packet) sniffer is a program that intercepts and decodes network traffic broadcast through a medium. It is easier to sniff wireless networks than wired ones. Sniffing can also help find the easy kill as in scanning for open access points that allow anyone to connect, or capturing the passwords used in a connection session that does not even use WEP, or in telnet, rlogin and ftp connections.

5 ) Passive Scanning :- Scanning is the act of sniffing by tuning to various radio channels of the devices. A passive network scanner instructs the wireless card to listen to each channel for a few messages. This does not reveal the presence of the scanner. An attacker can passively scan without transmitting at all. 

6) Detection of SSID :- The attacker can discover the SSID of a network usually by passive scanning because the SSID occurs in the following frame types: Beacon, Probe Requests, Probe Responses, Association Requests, and Reassociation Requests. Recall that management frames are always in the clear, even when WEP is enabled.
When the above methods fail, SSID discovery is done by active scanning 

7) Collecting the MAC Addresses :- The attacker gathers legitimate MAC addresses for use later in constructing spoofed frames. The source and destination MAC addresses are always in the clear in all the frames.

8) Collecting the Frames for Cracking WEP/WPA/mix :- The goal of an attacker is to discover the WEP shared-secret key. The attacker sniffs a large number of frames An example of a WEP/WPA/mix cracking tool is AirSnort ( http://airsnort.shmoo.com ).

9) Detection of the Sniffers :- Detecting the presence of a wireless sniffer, who remains radio-silent, through network security measures is virtually impossible. Once the attacker begins probing (i.e., by injecting packets), the presence and the coordinates of the wireless device can be detected.

10) Wireless Spoofing :- There are well-known attack techniques known as spoofing in both wired and wireless networks. The attacker constructs frames by filling selected fields that contain addresses or identifiers with legitimate looking but non-existent values, or with values that belong to others. The attacker would have collected these legitimate values through sniffing.

11) MAC Address Spoofing :- The attacker generally desires to be hidden. But the probing activity injects frames that are observable by system administrators. The attacker fills the Sender MAC Address field of the injected frames with a spoofed value so that his equipment is not identified.

12) IP spoofing :- Replacing the true IP address of the sender (or, in rare cases, the destination) with a different address is known as IP spoofing. This is a necessary operation in many attacks.

13) Frame Spoofing :- The attacker will inject frames that are valid but whose content is carefully spoofed.

14) Wireless Network Probing :- The attacker then sends artificially constructed packets to a target that trigger useful responses. This activity is known as probing or active scanning.

15) AP Weaknesses :- APs have weaknesses that are both due to design mistakes and user interfaces

16) Trojan AP :- An attacker sets up an AP so that the targeted station receives a stronger signal from it than what it receives from a legitimate AP.

17) Denial of Service :- A denial of service (DoS) occurs when a system is not providing services to authorized clients because of resource exhaustion by unauthorized clients. In wireless networks, DoS attacks are difficult to prevent, difficult to stop. An on-going attack and the victim and its clients may not even detect the attacks. The duration of such DoS may range from milliseconds to hours. A DoS attack against an individual station enables session hijacking.

18) Jamming the Air Waves :- A number of consumer appliances such as microwave ovens, baby monitors, and cordless phones operate on the unregulated 2.4GHz radio frequency. An attacker can unleash large amounts of noise using these devices and jam the airwaves so that the signal to noise drops so low, that the wireless LAN ceases to function.

19) War Driving :- Equipped with wireless devices and related tools, and driving around in a vehicle or parking at interesting places with a goal of discovering easy-to-get-into wireless networks is known as war driving. War-drivers (http://www.wardrive.net) define war driving as “The benign act of locating and logging wireless access points while in motion.” This benign act is of course useful to the attackers. 
Regardless of the protocols, wireless networks will remain potentially insecure because an attacker can listen in without gaining physical access.


Tips for Wireless Home Network Security 

1) Change Default Administrator Passwords (and Usernames)
2) Turn on (Compatible) WPA / WEP Encryption
3) Change the Default SSID
4) Disable SSID Broadcast 
5) Assign Static IP Addresses to Devices
6) Enable MAC Address Filtering 
7) Turn Off the Network During Extended Periods of Non-Use

8) Position the Router or Access Point Safely

- thanks kev

EMail Hacking

All email communications on the internet are possible by two protocols:
1) Simple Mail Transfer Protocol (SMTP port-25)
2) Post Office Protocol (POP port-110)

E-Mail hacking consists of various techniques as discussed below.

1) EMail Tracing :- Generally, the path taken by an email while travelling from sender to receiver can be explained by following diagram.


The most effective and easiest way to trace an email is to analyze it's email headers. This can be done by just viewing the full header of received email.

Recommended Tools
NeoTrace http://www.neotrace.com
VisualRoute http://visualroute.visualware.com
E-MailTracker http://www.visualware.com
-0-------------

others trik

----------------

EMail Forging

 EMail Forging :- Email forging allows an attacker to disguise the source of an email and send it to the victim. Most attackers use this technique to fool the victim into believing that somebody else has send the particular email.
The SMTP protocol makes it extremely easy for an attacker to send forged emails to a remote user.
Typically an attacker carries out email forging by following steps:

1) Start Command Prompt and type the following command-
c:/>telnet smtp.mailserver.com 25 or c:/>telnet mail.domain.com 25 
example:- c:/>telnet smtp.gmail.com 25
The above command opens a telnet connection to the specified remote mail server on port-25. Where port-25 is the default SMTP port on which outgoing mail daemon runs.

2) Once you are connected to the mail daemon of remote mail server, you would be greeted with a message similar to following:-


If you are not familiar with the smtp mail daemon commands then enter the keyword 'help' at daemon which may reveal all the supporting commands as shown below.


3) The correct sequence of commands to be executed is:-
a) helo mailserver1.com
b) mail from:abc@mailserver1.com
c) rcpt to:xyz@mailserver2.com
d) data
e) .(dot command represents end of mail body)
This all as shown in figure below:

 EMail forging by this technique does not possible, if mail relying is disabled by it's service provider.
---

 Spam :- Every e-mail account and network on the internet has limited space and bandwidth. This means that if an attacker is able to clog up all the inbox space and bandwidth of the target computer, it could cause lot of inconvenience and unnecessary trouble. Spam e-mails have slowly but surely started clogging up the bandwidth on the internet and the memory space in our inboxes.

MailBombing:- Mailbombing is a technique wherein the attacker floods victim's e-mail account with an extremely large (sometimes infinite) number of unsolicited meaningless e-mails. Two different types of mailbombing are-

a) Mass Mailbombing
b) List Linking Mailbombing

thanks - kev


Address Resolution Protocol (ARP) Attacks

What Does ARP Mean?
Address Resolution Protocol (ARP) is a stateless protocol, was designed to map Internet Protocol addresses (IP) to their associated Media Access Control (MAC) addresses. This being said, by mapping a 32 bit IP address to an associated 48 bit MAC address via attached Ethernet devices, a communication between local nodes can be made.

On a majority of operating systems, such as Linux, FreeBSD, and other UNIX based operating systems, and even including Windows, the "arp" program is present. This program can be used to display and/or modify ARP cache entries.

An example of the "arp" utility's output would look like the following:

Windows:
> arp -a
Interface: 192.168.1.100 .- 0x10003
Internet Address Physical Address Type
192.168.1.1 00-13-10-23-9a-53 dynamic

Linux:
$ arp -na
? (192.168.1.1) at 00:90:B1:DC:F8:C0 [ether] on eth0

FreeBSD:
$ arp -na
? (192.168.1.1) at 00:00:0c:3e:4d:49 on bge0


How ARP works?
Specifically for Internet Protocol Version 4 (IPv4), ARP maps IP addresses between the Network layer and Data Link layer of the Open System Interconnection (OSI) model.
For a more complete and thorough explanation of how address resolution works, and protocol specifics, please consult RFC 826.


ARP Protocol Flaws :-
ARP's main flaw is in its cache. Knowing that it is possible for ARP to update existing entries as well as add to the cache, this leads one to believe that forged replies can be made, which result in ARP cache poisoning attacks.


Terms & Definitions :-
ARP Cache Poisoning : Broadcasting forged ARP replies on a local network. In a sense, "fooling" nodes on the network. This can be done because ARP lacks authentication features, thus blindly accepting any request and reply that is received or sent.

MAC Address Flooding : An ARP cache poisoning attack that is mainly used in switched environments. By flooding a switch with fake MAC addresses, a switch is overloaded. Because of this, it broadcasts all network traffic to every connected node. This outcome is referred to as "broadcast mode" because, all traffic passing through the switch is broadcasted out like a Hub would do. This then can result in sniffing all network traffic.


The ARP Attacks :-
1] Connection Hijacking & Interception : Packet or connection hijacking and interception is the act in which any connected client can be victimized into getting their connection manipulated in a way that it is possible to take complete control over.

2] Connection Resetting : The name explains itself very well. When we are resetting a client's connection, we are cutting their connection to the system. This can be easily done using specially crafted code to do so. Luckily, we have wonderful software that was made to aid us in doing so.

3] Man In The Middle : One of the more prominent ways of attacking another user in order to hijack their traffic, is by means of a Man In The Middle (MITM) attack. Unlike the other attacks, a MITM is more a packet manipulation attack which in the end however does result in packet redirection to the attacker . all traffic will get sent to the attacker doing the MITM attack. This attack however is specific. As opposed to MAC Address Flooding or other attacks against a router/switch, the MITM attack is against a victim, and also can be done outside of a switched environment. Thus meaning, an attack can be executed against a person on the other side of the country.

4] Packet Sniffing : Sniffing on a Local Area Network (LAN) is quite easy if the network is segmented via a hub, rather than a switch. It is of course possible to sniff on a switched environment by performing a MAC flood attack. As a result of the MAC flood, the switch will act as a hub, and allow the entire network to be sniffed. This gives you a chance to use any sort of sniffing software available to you to use against the network, and gather packets.

5] Denial of Service : MAC Address Flooding can be considered a Denial of service attack. The main idea of the MAC flood, is to generate enough packet data to send toward a switch, attempting to make it panic. This will cause the switch to drop into broadcast mode and broadcast all packet data. This however did not result in a crash, or the service to be dropped, but to be overloaded.


Thanks kev

Basic Network Hacking

Network Hacking is generally means gathering information about domain by using tools like Telnet, NslookUp, Ping, Tracert, Netstat, etc.
It also includes OS Fingerprinting, Port Scaning and Port Surfing using various tools.

Ping :- Ping is part of ICMP (Internet Control Message Protocol) which is used to troubleshoot TCP/IP networks. So, Ping is basically a command that allows you to check whether the host is alive or not.
To ping a particular host the syntax is (at command prompt)-- 
c:/>ping hostname.com

example:- c:/>ping www.google.com

Various attributes used with 'Ping' command and their usage can be viewed by just typing c:/>ping at the command prompt.


Netstat :- It displays protocol statistics and current TCP/IP network connections. i.e. local address, remote address, port number, etc. 
It's syntax is (at command prompt)--
c:/>netstat -n


Telnet :-
Telnet is a program which runs on TCP/IP. Using it we can connect to the remote computer on particular port. When connected it grabs the daemon running on that port. 
The basic syntax of Telnet is (at command prompt)-- 
c:/>telnet hostname.com

By default telnet connects to port 23 of remote computer. 
So, the complete syntax is-
c:/>telnet www.hostname.com port

example:- c:/>telnet www.yahoo.com 21 or c:/>telnet 192.168.0.5 21


Tracert :- It is used to trace out the route taken by the certain information i.e. data packets from source to destination. 
It's syntax is (at command prompt)-- 
c:/>tracert www.hostname.com
example:- c:/>tracert www.insecure.in

Here "* * * Request timed out." indicates that firewall installed on that system block the request and hence we can't obtain it's IP address.

various attributes used with tracert command and their usage can be viewed by just typing c:/>tracert at the command prompt.

The information obtained by using tracert command can be further used to find out exact operating system running on target system.


Thanks -=kevin=-

Rabu, 24 Desember 2008

CISCO Learning & Workshop 2009


Kami menyelenggarakan CISCO Learning & Workshop hari minggu (11 Januari 2009) dari jam 09.00 - 16.00 WIB. 

Acara ini diselenggarakan sebagai pengetahuan basic/advance mengikuti ujian CISCO Sertifikasi. 
Untuk informasi lebih lengkapnya Anda dapat menghubungi sekretariat pendaftaran resmi
ke management ISIC di nomor telp. 0761-62886 atau 0761-8365820 setiap hari kerja.
Biaya registrasi Rp.25.000,- Biaya Learning & Workshop Rp.300.000,-
Segala bentuk pembiayaan harus telah diterima panitia dua hari sebelum tanggal pelaksanaan.
Baik melalui pembayaran langsung maupun transfer. 
Untuk pembayaran melalui transfer, bukti pembayaran harus dikirimkan via fax. di nomor faximile 0761-62886 atau email : greenarya.mg@gmail.com

Sabtu, 15 Maret 2008

Scanning Networks / Cek jaringan

Scanning helps one to know what services are running on a machine. This will show the open ports on which services are listening for connections. First we will determine whether the target machine is alive or not. This can be done by sending a icmp echo request packet to the server. The server would respond with a icmp echo reply showing that it’s alive. The process to do this on a range of hosts or ipaddresses is known as ping sweep. Of the many methods used, we will look on ICMP ping and echo port ping.

ICMP ping

Your machine will send an icmp echo request (type 8) to the target machine and it would respond with an icmp echo reply(type 0) if it is alive. You can use the Unix ping command to do this:

[root@ns2 root]# ping -c 3 66.218.71.86
PING 66.218.71.86 (66.218.71.86) from 203.41.193.140 : 56(84) bytes of data.
64 bytes from 66.218.71.86: icmp_seq=1 ttl=51 time=207 ms
From 203.41.193.137: icmp_seq=2 Redirect Host (New nexthop: 202.5.165.81)
64 bytes from 66.218.71.86: icmp_seq=2 ttl=51 time=204 ms
64 bytes from 66.218.71.86: icmp_seq=3 ttl=51 time=203 ms

--- 66.218.71.86 ping statistics ---
3 packets transmitted, 3 received, 0% loss, time 2019ms
rtt min/avg/max/mdev = 203.938/205.171/207.287/1.503 ms
[root@ns2 root]#

At the end it will give you a summary, showing statistics of number of packets received and sent and the %age of packet loss.

Echo port ping

This makes use the echo service running on the target machine which runs on port 7. Whatever you send it, will be echoed back to you. So if you see that it echoed back what you sent, then you can be sure that the target machine is alive.

Two interesting tools on Linux is Fping and Nmap

Fping

Fping sends multiple icmp request packets simultaneously and processes the reply as they occur. This makes ping sweeps faster. Fping can be feeded with an ipaddress or can be given a list of ipaddress on a file.

[root@Krishna]# fping -a -g 203.122.1.0 203.122.1.80
203.122.1.9
203.122.1.26
203.122.1.37
203.122.1.47
203.122.1.54
203.122.1.42
203.122.1.68
203.122.1.80
[root@Krishna]#

Type fping -h for a full listing of available options.

Nmap

Nmap is a powerful tool that can do a lot more than ping sweep.
To use nmap for ping sweeping use the –sP argument.
[root@ns2 root]# nmap -sP 203.122.58.0/24

Starting nmap V. 3.00 ( www.insecure.org/nmap/ )
Host (203.122.58.1) appears to be up.
Host (203.122.58.2) appears to be up.
Host (203.122.58.5) appears to be up.
Host (203.122.58.6) appears to be up.
Host (203.122.58.9) appears to be up.
Host (203.122.58.10) appears to be up.
Host (203.122.58.13) appears to be up.
Host (203.122.58.14) appears to be up.
caught SIGINT signal, cleaning up
[root@ns2 root]#

If ICMP is blocked on the firewall of the target machine, additional techniques can be used to determine whether systems are alive.
Nmap provides a advanced option called TCP ping scan. It is initiated with the argument –PT with a port number such as port 80, since packets to this port is allowed by many firewall and border routers to the systems on their demilitarized zone (DMZ).

[root@ns2 root]# nmap -sP -PT80 203.122.58.0/24

Starting nmap V. 3.00 ( www.insecure.org/nmap/ )
Host (203.122.58.1) appears to be up.
Host (203.122.58.2) appears to be up.
Host (203.122.58.5) appears to be up.
Host (203.122.58.6) appears to be up.
Host (203.122.58.9) appears to be up.
Host (203.122.58.10) appears to be up.
Host (203.122.58.13) appears to be up.
Host (203.122.58.14) appears to be up.
caught SIGINT signal, cleaning up
[root@ns2 root]#

Icmpenum

This tool from Simple Nomad (http://www.nmrc.org/project/misc/icmpenum-1.1.1.tgz) .
Even if the border router or firewall blocks ICMP echo packets , the systems status of being alive can be determined by looking for a different ICMP type, like icmp time stamp request and icmp info requests.
[krishna]# icmpenum –i2 –c 192.168.1.0

In the above example, we enumerated the entire 192.168.1.0 class C network using an icmp time stamp request . Icmpenum can send spoofed packets to avoid detection. Use the s argument to send spoofed packets and passively listen for responses with the p switch.

Icmpquery


Icmpquery can be found at http://packetstormsecurity.com/UNIX/scanners/icmpquery.c
Ping sweeps makes use of icmp echo packets , but there are a lot more types of icmp packets which can be used to gather valuable information about the system. For example you can request the time ona system by sending an ICMP type 13 message (TIMESTAMP) and you can request the netmask of a particular device with the ICMP type 17 message (ADDRESS MASK REQUEST).
To query a routers time, you can run the command:
[root@ns2 files]# ./icmpquery -t 213.206.75.252
213.206.75.252 : Sun Jun 8 16:46:30 2003
[root@ns2 files]#

and to query a routers netmask, use

[Krishna]# icmpquery –m 213.206.75.252

Windows tools:


To do ping sweeps in windows, try the freeware pinger from Rhino9 (http://nmrc.org/snt). Some other tools for windows are Ping Sweep from Solarwinds (http://www.solarwinds.net)
WS_Ping ProPack (http://www.ipswitch.com) NetScan Tools (http://www.nwpsw.com)

Port Scanning:


Port scanning is the process of connecting to TCP and UDP ports on the target system to determine what services are running or in a listening state. Identifying listening ports is essential to determine the type of operating system and application in use on the system.

Types of port scanning:

1.) TCP connect scan: This type of scan connects to the target port and completes a full three way handshake (SYN, SYN/ACK and ACK).
2.) TCP SYN scan: This is also called half-open scanning because it does not complete the three-way handshake, rather a SYN packet is sent and upon receiving a SYN/ACK packet it is determined that the target machines port is in a listening state and if an RST/ACK packet is received , it indicates that the port is not listening.
3.) TCP FIN scan: This technique sends a FIN packet to the target port and based on RFC 793 the target system should send back an RST for all closed ports.
4.) TCP Xmas Tree scan: This technique sends a FIN,URG and PUSH packet to the target port and based on RFC 793 the target system should send back an RST for all closed ports.
5.) TCP Null scan: This technique turns off all flags and based on RFC 793 , the target system should send back an RST for all closed ports.
6.) TCP ACK scan: This technique is used to map out firewall rulesets. It can help determine if the firewall is a simple packet filter allowing only established connections or a stateful firewall performing advance packet filtering.
7.) TCP Windows scan: This type of scan can detect both filtered and non-filtered ports on some systems due to anomaly in the way TCP windows size is reported.
8.) TCP RPC scan: This technique is specific to UNIX systems and is used to detect and identify Remote Procedure Call (RPC) ports and their associated program and version number.
9.) UDP scan: This technique sends a UDP packet to the target port. If the target ports responds with an “ICMP port unreachable” message, the port is closed, if not then the port is open. This is a slow process since UDP is a connectionless protocol, the accuracy of this technique is dependent on many factors related to utilization of network and system resources.

We will now discuss some of the more popular and time proven port scanners.
Strobe


Download it from ftp://ftp.rpmfind.net/linux/redhat/7.1/en/powertools/i386/RedHat/RPMS/strobe-1.04-8.i386.rpm

It is one of the fastest and most reliable TCP scanners, it can also grab the associated banner of a particular port. Strobe is a TCP scanner and does not provide UDP scanning capability, as such it can be easily detected by the target machine.

[root@ns2 files]# strobe 213.206.75.252
strobe 1.04 (c) 1995-1997 Julian Assange (proff@suburbia.net).
213.206.75.252 21 ftp File Transfer [Control] [96,JBP]
-> 220-FTP server ready.
-> 220 Only anonymous FTP is allowed here
213.206.75.252 80 http www www-http World Wide Web HTTP
www World Wide Web HTTP [TXL]
[root@ns2 files]#

For a UDP port scanner try udp_scan by SATAN(Security Administrator Tool for Analyzing Networks).

Netcat


This is known to be called the Swiss army knife in security toolkit. It provides both TCP and UDP scanning capabilities. The -v and -vv options provide verbose output, the -z option is used for port scanning, and the -w2 option provides a timeout value for each connection. By default nc uses TCP ports, the -u option is so used to specify UDP scanning.

[root@ns2 files]# nc -v -z -w2 203.122.61.154 1-140
ns2.spectra.com [203.122.61.154] 111 (sunrpc) open
ns2.spectra.com [203.122.61.154] 80 (http) open
ns2.spectra.com [203.122.61.154] 53 (domain) open
ns2.spectra.com [203.122.61.154] 23 (telnet) : No route to host
[root@ns2 files]#

[root@ns2 files]# nc -u -v -z -w2 203.122.61.154 1-140
ns2.spectranet.com [203.122.61.154] 132 (?) open
ns2.spectranet.com [203.122.61.154] 131 (?) open
ns2.spectranet.com [203.122.61.154] 130 (?) open
ns2.spectranet.com [203.122.61.154] 129 (?) open
ns2.spectranet.com [203.122.61.154] 128 (?) open
ns2.spectranet.com [203.122.61.154] 127 (?) open
ns2.spectranet.com [203.122.61.154] 126 (?) open
punt!
[root@ns2 files]#

Network Mapper (nmap)

Nmap from http://www.insecure.org/nmap is a all in one tool. To see a possible list of options use

[root@ns2 files]# nmap –h

[root@ns2 files]# nmap -sP 192.168.0.172

Starting nmap V. 3.00 ( www.insecure.org/nmap/ )
Host ns2.krishna.com (192.168.0.172) appears to be up.
Nmap run completed -- 1 IP address (1 host up) scanned in 3 seconds
[root@ns2 files]#

Nmap allows you to enter ranges in CIDR(Classless Inter-Domain Routing) block notation. The –oN will save the output to a human-readable format and use –oM to save it in a tab-delimited file.

[root@ns2 files]# nmap –sF 203.122.58.0/24 –oN outfile

Windows based port scanners


NetScanTools Pro 2000 http://www.nwpsw.com
SuperScan http://www.foundstone.com/rdlabs/termsofuse.php?filename=superscan.exe
WinScan: http://www.prosolve.com
IpEye http://www.ntsecurity.com
NetCat http://www.atstake.com/research/tools/nc11nt.zip
WUPS http://www.ntsecurity.nu
Fscan http://www.foundstone.com/rdlabs/termsofuse.php?filename=fscan.exe

Thanks Bro ...
Krishna
http://www.KrisinDigitalAge.com

Selasa, 11 Maret 2008

GFI LANguard Network Security Scanner 8

GFI LANguard Network Security Scanner is a tool to audit network security and proactively secure it. It scans entire networks from an attacker's perspective, and analyses machines for open ports, shares, security alerts/vulnerabilities, service pack level, installed hotfixes and other NETBIOS information such as hostname, logged on user name, users etc. It does OS detection, password strength testing and detects registry issues.

GFI LANguard N.S.S. is a complete patch management solution. After it has scanned your network and determined missing patches and service packs - both in the operating system (OS) and in the applications - you can use GFI LANguard N.S.S. to deploy those service packs and patches network-wide.

Key Features in GFI LANguard Network Security Scanner 8

In this Help Net Security video, Andre Muscat, the Director for the Development of Network Security Products at GFI discusses the key features in the latest release of the GFI LANguard Network Security Scanner.

Download :
http://www.net-security.org/dl/software/languardnss8.exe


yudhax